
Wednesday, December 30, 2009
Exporting Paths from Adobe Illustrator to 3ds Max - Tip
Few days ago I met problem with saving some basics paths from Adobe Illustrator to 3ds Max. Problem occurred during importing .ai file to Max. There was error with description that file can not be imported because file's type is unknown. The solution for that problem was to change newest version to legacy. For instance from version CS4, CS4 and so on to Illustrator 8.0. It works perfectly and correctly. Finally I was able to import some paths to Max and worked on them.
Thursday, December 17, 2009
Military Chests
Lowpoly models for my friend's master diploma project. Modeled, textured in 3ds Max. Diffuse and Ambient Occlusion passes. Compositing in Photoshop with color correction.

Digital Painting
I did this painting for my personal project. For long time I had this picture in my imagination and finally I found time to painted it.

Logistics Support - Web design
I'm cooperating with Losigistics Support and designing web site for them. Here you can see some samples of designing and concepts. There are two versions - light and dark.


I tried mix some texture with designing. It gives great looking style.
Tuesday, November 10, 2009
Changing picture resolution down Sharpen Filter helpful again
This technique is very helpful for another one situation. If you are working with big resolution picture which has a lot of description (for example maps, fonts), details and you will have to decreasing resolution to less picture. Maybe for posting in web the details, descriptions as types will be blurred and washed because of removing some pixels from picture during changing image size down. Than you can apply sharpen filter for recovering those details from your art work. I tried this when I was working for APO, designing the map for their online game. I posted it below.

Whiteout sharpness the map looks bad and names of location weren't readable. It was very noticeable from closed distance after zoomed image in.
Photoshop Sharpen Filter Tip
I would like to share some tip that I discovered working in Photoshop during making Video Copilot Banner. It gave me batter look and mood of banner and also increase quality as riddance of graphic too. It was more clean and all elements were better consisted together. Working with another one posted in this tread. I noticed that I can improve a quality by adding a little sharpness for finished version of banner.
What I did I made a copy of layer (short key ctrl + J) and turned it to Smart Filter. Smart Filter helps you precisely adjust amount of effect of filter that you applied to your graphic without doing this same again by deleting and creating layers. Smart Filters appear in the Layers panel below the Smart Object layer to which they are applied. Because you can adjust, remove, or hide Smart Filters, they are nondestructive. You can get more information from Photoshop Online Support. Next step is just applying sharpening filter Filter/Sharpen/Sharpen More and adjusting opacity for better consisting both layer. We don’t want to be sharpness too strong. If the effect is too hard in some parts of picture I also using Mask and Soft Brushes for better and precises adjusting. That’s all. You can also try others sharpen filters, something one will be better than others. It depends on your project.
I thinks it’s very settle effect but improve quality of your designing. Everything is more clear. We removed this washed and blurred effects that was not very good. I think many people forgetters about sharpening and leaves graphics blurred and not sharp and strong clear. I think with this kind of effect it looks more filmy.
Here below you can see the difference between banners.

On the left without sharpness filter, on the left after applying Sharpen More filter. I think it doesn't need any additional comment.

In conclusion I enquire you for using this kind of technique for improving quality and clearness your art works. If you need more information or have some answers don’t hesitate to email me.
Tuesday, October 27, 2009
Burst Test
My little play with PArray in Max and rapid postproducion in AE. This's second and longer version. I plan to add some sounds for better mood.
Monday, September 28, 2009
Trivialart Blogger Banners
I changed top banner in blog today. This's former one. The oldest go to the end.

In this post i will be putting old banners which were used for blogger.

Teapots
I just wanted to try some different style. I made this random designing for fun and creative training. Project is composition of 3d rendered teapots and 2d designed elements in Photoshop.

Monday, September 21, 2009
Trivialart 3D
I'd like to train a little bit with 3D and set extension. I did some in max using matte/shadow/reflections material. In the picture you can see Kristofer doing a model of main character for our animation.

Saturday, September 12, 2009


Thursday, September 10, 2009
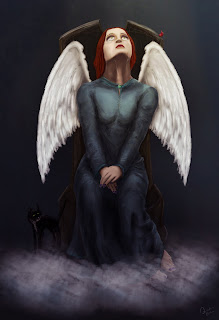
Digital Painting - Angel
Wreszcie ukończyłem projekt, który leżał na dysku od prawie roku. Znalazł się czas i przede wszystkim "motywacja", gdyż praca zarazem stała się prezentem. Inspiracji nie brakowało, zapału i chęci również. Praca oczywiście wykonana na tablecie Wacom Bamboo Fun w Photoshopie.

Tuesday, September 8, 2009
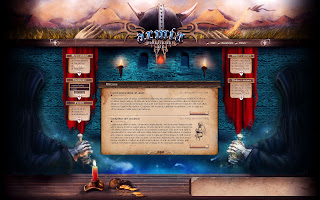
Armia Podkarpacki OTS
Kilkanaście dni temu zakończyliśmy pracę i doszlifowywanie portalu APO. Całość grafiki została wykonana ręcznie, wszelkie rysunki i efekty malowane przy użyciu tabletu Wacom Bamboo Fun. Layout został skrojony i złożony wyłącznie przy użyciu szablonów stylów CSS, oraz JavaScript. Wszystko według najnowszych standardów, zgodne z wymaganiami W3C i kompatybilne z wiodącymi przeglądarkami internetowymi. Odświeżenie grafiki i zmiana wizerunku strony była procesem dość ryzykownym. Użytkownicy byli przyzwyczajeni do starego, skromnego layoutu. Jednak większości graczom nowy design przypadł do gustu i można stwierdzić, że zmiana grafiki dodała stronie lepszego klimatu i jakości.

Video Copilot Banner Contest
Na jednej z moich ulubionych stron o VFX pojawił się mały "contest" na banery promujące stronę Video Copilot. Tworzenie tego typu rzeczy to świetna zabawa i przy okazji kreatywny trening.
Więcej na stronie projektu VC

Więcej na stronie projektu VC

Motion Web Promo
Wreszcie znalazłem chwilę by pobawić się czymś innym niż 3d. Mała prezentacja, promo wcześniej wykonanej przeze mnie strony dla APO. Kompozycja wykonana w After Effects, całość złożona w Permierze. Link do strony: www.armia.toproste.pl
Link do youtube: Motion Web Promo HQ
Podkład muzyczny pochodzi z utworu Chris Cornell feat. Timbaland - Part of me.
Link do youtube: Motion Web Promo HQ
Podkład muzyczny pochodzi z utworu Chris Cornell feat. Timbaland - Part of me.
Monday, September 7, 2009
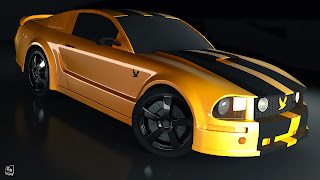
Ford Mustang GTO
Inne ujęcie Forda, bez większej ingerencji w oświetlenie sceny. Próbkowanie 1/16 Lanczos, wynik satysfakcjonujący. Większość szumu pozbyłem się przy pomocy narzędzia Blur Tool w Photoshop'ie co pozwoliło mi zaoszczędzić kilka godzin renderingu. Metoda dosyć wydajna. Szybka postprodukcja, korekcja kolorów i zmieszanie warstwy z Ambient Occlusion dla polepszenia detali cienia.


Wednesday, August 26, 2009
Ford Mustang GTO
Skończona wizja Forda Mustanga GTO. Pierwsze starcie z modelowaniem i wizualizacją samochodu. Sporo pracy, ale myślę że warto. Model wykonany w 3ds Max, rendering Mental Ray, postprodukcja w Photoshop. Godzin modelowania, tworzenia materiałów, oraz prób z renderami nie liczę. Sam render finalny dla rozdzielczości 720p przy próbkowaniu 4/64 to bagatela 5:41:37.

Monday, August 24, 2009
Szybkość, a jakość - Final Gather w Mental Ray'u

Jakiś czas temu napisałem referat o renderowaniu wizualizacji wnętrz w 3ds Max 2009 przy użyciu silnika renderującego Mental Ray. Artykuł zawiera sporo wskazówek dotyczących parametrów samego silnika, jego ustawień i funkcji. Dodatkowo zawarty jest opis najważniejszych funkcji Final Gather'a. Ponadto przedstawiłem proces renderingu i organizacji pracy od wstępnych faz (testowania, dobór światła itd.), aż po ostateczny render (pipeline). Zachęcam do lektury i ćwiczeń, poniżej zamieszczam krótkie wprowadzenie, oraz finalny render sceny użytej podczas pisania referatu. Sam referat został wygłoszony podczas tegorocznej sesji kół naukowych Politechniki Krakowskiej.
Szybkość, a jakość - Final Gather w Mental Rayu
Arkadiusz Leszko
Powszechnie wiadomo, że renderowanie jest procesem kosztownym ze względu na czas. Sam rendering to proces tworzenia danych wyjściowych o różnym stopniu złożoności dla obiektów sceny[1]. W zależności od skomplikowania sceny może się on wahać od kilku godzin do kilku dni i tygodni. Mental Ray jest wysoko wydajnościowym silnikiem renderowania, pozwalającym generować obrazy fotorealistyczne i w swoim działaniu wykorzystuje metodę śledzenia promieni świetlnych.W grafice komputerowej rozróżniamy dwa główne typy oświetlenia: Global Illumination (Oświetlenie globalne) i Indirect Illumination.(Oświetlenie pośrednie). Bez odpowiednich algorytmów symulujących poprawnie zachowanie tych dwóch typów oświetlenia nie jesteśmy w stanie osiągnąć obrazów fotorealistycznych. Shadery typu Indirect Illumination obliczają światło pochodzące nie tylko od źródła, którym może być żarówka, czy słońce, ale także odbite od innych obiektów w scenie. Na potrzeby rozwiązania tych problemów Mental Ray wykorzystuje dwie podstawowe metody generowania (symulowania) oświetlenia typu Indirect Illumination. Jest to Final Gather, oraz GIobal Illumination wykorzystujący w swoim działaniu fotony. Final Gather opiera swoje działanie na promieniach, które są rozpraszane w scenie. Stąd jego skuteczność często wynika z ilości promieni, które będzie wykorzystywał. Dodatkową ich własnością jest możliwość odbijania się od powierzchni, dzięki czemu uzyskiwany jest efekt "krwawienia kolorów" (Color bleeding). Rendering nabiera większego realizmu. Porównując wydajność aplikacji 64-bitowej z 32 bitową możemy zauważyć, że dla małych zadań, renderingów testowych aplikacja w środowisku x86 wykazywała minimalnie lepszą wydajność ze względu na czas. Jendak w przypadku, gdy próbujemy wyrenderować naszą scenę z maksymalnymi ustawieniami i w dużej rozdzielczości, środowisko x64 okazuje się znacznie lepsze. Warto przy pracy z programami do obróbki i tworzenia grafiki sięgnąć po system i aplikacje 64-bitowe.
It is known that rendering is very time consuming. It is a process of making 3D scene data output in the form of image. It depends on variety and complexity of the scene and it can take from few hours to several days. Mental Ray is a highly efficient rendering engine. It allows for making photorealistic images, and it uses ray tracing algorithms. Computer graphics mainly use two types of illumination: Global Illumination and Indirect Illumination. Shaders of Indirect Illumination’s type compute light coming from many different light sources, which can be sun or lamp, but also diffused light, which comes from other objects in scene. Mental ray applies Final Gather for simulation of Indirect Illumination. FG uses rays, which are distributed in the whole scene. FG rays can bounce and make color bleeding effect. The render is more realistic when Final Gather is used. When we compare efficiency of 64-bits applications whit 32-bits ones, we can observe that for small tasks and test renders x86 enviroment is minimal better, regarding the rendering time. However , rendering in x64 enviroment, in the case of maximum quality and big image resolution, is more accurate and productive.
[1] Kelly L. Murdock – „3ds Max 8 Biblia”
Subscribe to:
Posts (Atom)

